Maintaining your ceiling lights is essential for not only keeping your living space well-lit, but also for ensuring the longevity of these fixtures. From simple cleaning techniques to regular inspection, this article provides a comprehensive guide on how to properly care for your ceiling lights. By following these easy steps, you can enjoy bright and beautiful illumination in your home for years to come.
Cleaning and Dusting
Regular dusting
Regular dusting is an essential part of maintaining your ceiling lights. Dust tends to accumulate on light fixtures over time, which not only dulls their appearance but also reduces their overall brightness. To keep your ceiling lights looking their best, make sure to dust them regularly using a soft, dry cloth. Gently wipe down the surface of the fixtures to remove any accumulated dust.
Removing dirt and grime
In addition to dusting, you may also need to remove dirt and grime from your ceiling lights from time to time. Start by dampening a cloth with a mixture of mild dish soap and warm water. Carefully wipe down the fixtures, being mindful not to apply too much pressure. Rinse the cloth with clean water and repeat the process until all the dirt and grime is removed. Make sure to dry the fixtures thoroughly afterwards to prevent water damage.
Cleaning glass fixtures
If your ceiling lights have glass components, such as shades or covers, they may require special care. To clean glass fixtures, mix white vinegar with water in a 1:1 ratio and spray the solution onto a lint-free cloth. Gently wipe the glass surfaces, ensuring that you remove any smudges or fingerprints. For stubborn stains, you can use a glass cleaner specifically designed for delicate surfaces. Avoid using abrasive materials or harsh chemicals that may damage the glass. Finish off by drying the glass thoroughly with a clean cloth.
Changing Light Bulbs
Determining the right bulb
When it comes to changing light bulbs in your ceiling lights, it’s important to ensure you use the correct type and wattage. Refer to the manufacturer’s instructions or the label on the fixture to determine the suitable bulb size and wattage. Using an incorrect bulb can not only affect the brightness of the light but also pose a safety hazard. If you’re unsure about the appropriate bulb to use, consult with a lighting expert or refer to the product manual.
Turning off power
Before replacing a light bulb, always remember to turn off the power to the fixture. This can be done by flipping the corresponding switch on your circuit breaker or fuse box. It’s crucial to confirm that the power is off by testing the light switch and ensuring the fixture is not illuminated. This precautionary step will protect you from potential electrical shocks or accidents while changing the bulb.
Replacing the bulb
Once the power is safely turned off, you can proceed to replace the light bulb. Carefully unscrew the old bulb in a counterclockwise motion and dispose of it properly. Take the new bulb and insert it into the socket, turning it clockwise until it is securely in place. Avoid touching the bulb with your bare hands as the oils from your skin can potentially damage the bulb or cause it to burn out prematurely. If necessary, use a clean cloth or gloves to handle the bulb. Finally, restore the power by flipping the switch back on and test the new bulb to ensure it is functioning correctly.

Handling Fragile Materials
Using caution with delicate fixtures
Some ceiling lights, particularly those with delicate ornaments or intricate designs, require extra caution when handling them. When cleaning or performing maintenance, be mindful of any fragile components and handle them with care. Avoid applying excessive pressure or force that may cause them to break or become loose. It’s always a good idea to refer to the manufacturer’s instructions or consult a lighting expert when dealing with fragile fixtures.
Protecting glass and crystal
Ceiling lights featuring glass or crystal elements add elegance and sophistication to any space. However, these materials are prone to scratching or chipping if not handled properly. When cleaning or maintaining such fixtures, take extra precautions to safeguard the glass or crystal. Use a soft, lint-free cloth to gently wipe away dust, and avoid using abrasive cleaning agents that may cause damage. If the fixture is particularly ornate or valuable, consider seeking professional help for maintenance.
Securing loose parts
Over time, some ceiling lights may develop loose parts due to vibrations or wear and tear. Loose screws, bolts, or other components can compromise the stability and safety of the fixture. Regularly inspect your ceiling lights for any signs of loose parts and take the necessary steps to secure them. Using a screwdriver or appropriate tool, tighten any loose screws or bolts and ensure that all parts are properly fastened to avoid any potential hazards.
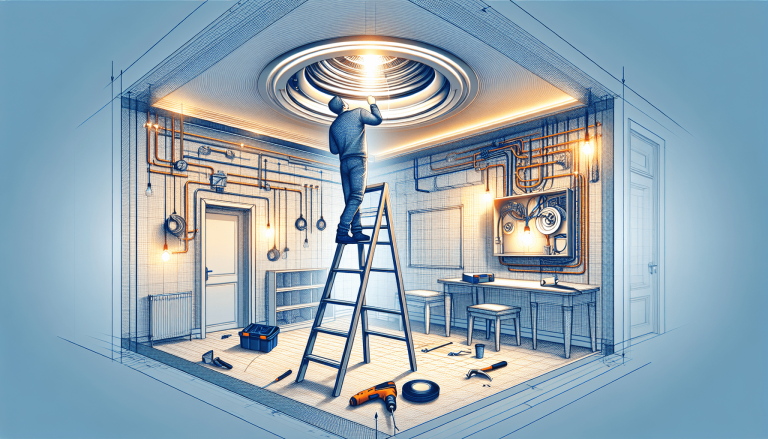
Dealing with Electrical Issues
Checking for loose connections
Electrical issues can arise with ceiling lights, causing flickering or dimming of the lights. In such cases, it’s crucial to inspect for loose connections. Turn off the power to the fixture and carefully examine the wiring and socket connections. Gently tighten any loose wires or connections using a screwdriver. If you’re not confident in dealing with electrical components, it’s always best to consult a licensed electrician to handle the repairs.
Troubleshooting flickering lights
Flickering lights can be not only annoying but also an indication of an underlying issue. If your ceiling lights are flickering, there are a few steps you can take to troubleshoot the problem. First, ensure that the light bulbs are securely screwed into the socket and that they are the correct wattage. Check if the issue persists after replacing the bulbs. If the problem persists, it could be a wiring problem or a faulty dimmer switch. Seek professional help to diagnose and resolve the issue.
Replacing faulty wiring
If you encounter persistent electrical issues with your ceiling lights, it may be indicative of faulty wiring. Faulty wiring can cause lights to flicker, fail to turn on, or even pose a fire hazard. In these cases, it’s critical to hire a licensed electrician to replace the faulty wiring. Attempting to fix electrical wiring issues on your own can be dangerous and may lead to further damage or personal injury. Always prioritize your safety and seek professional assistance for any electrical repairs.

Preventing Damage
Avoiding excessive heat exposure
Excessive heat exposure can damage not only the appearance but also the functionality of your ceiling lights. Avoid installing lights in areas with excessive heat sources such as fireplaces or heaters. High temperatures can cause the fixtures to become discolored, warp, or even melt. It’s crucial to choose ceiling lights suitable for the intended location and to follow the manufacturer’s guidelines regarding heat exposure.
Protecting against moisture
Moisture can be detrimental to ceiling lights, particularly those installed in bathrooms or near water sources. Exposure to moisture can lead to corrosion, rust, or even electrical malfunctions. To protect against moisture damage, ensure that your ceiling lights are properly sealed and installed in appropriate areas. Consider using sealed bulbs, gaskets, or waterproof covers to provide an additional layer of protection. Regularly inspect the fixtures for any signs of moisture and address any issues promptly.
Shielding from direct sunlight
Direct sunlight can also cause damage to certain types of ceiling lights. UV rays can fade or discolor materials, such as fabric shades or plastic components. If your ceiling lights are exposed to direct sunlight, consider installing window treatments or using protective coverings to shield them during the sunniest parts of the day. Additionally, choosing light bulbs with UV protection can help mitigate the effects of sunlight on your fixtures.
Maintaining Outdoor Ceiling Lights
Weatherproofing outdoor fixtures
Outdoor ceiling lights are exposed to the elements, making weatherproofing crucial for their durability. When installing outdoor fixtures, ensure they are rated for outdoor use and suitable for the specific weather conditions in your area. Weatherproofing can involve sealing electrical connections, applying silicone or rubber gaskets to protect against moisture, and using rust-resistant materials. Regularly inspect your outdoor ceiling lights for signs of wear or damage caused by weathering and address any issues promptly.
Cleaning dirt and debris
Outdoor ceiling lights tend to accumulate dirt, dust, and debris more quickly than indoor fixtures. Regular cleaning is essential to maintain their appearance and functionality. Begin by removing any loose debris with a soft brush or broom. Then, use a gentle, non-abrasive cleaner and a cloth or sponge to wipe down the surfaces. Avoid using high-pressure water sprays or abrasive materials that may damage or scratch the fixtures. Lastly, thoroughly rinse the fixtures and ensure they are completely dry before restoring power.
Replacing water-damaged components
Despite weatherproofing measures, outdoor ceiling lights can still be susceptible to water damage, especially during heavy rains or storms. If you notice any signs of water damage, such as discoloration, corrosion, or malfunctioning of the lights, it’s essential to replace the affected components. Contact a lighting professional or electrician who specializes in outdoor lighting to assess the damage and recommend appropriate replacement parts. Prompt action can prevent further damage and ensure the continued safety of your outdoor lighting.
Inspecting for Safety
Checking for loose screws or bolts
Regularly inspecting your ceiling lights for loose screws or bolts is an important safety measure. Over time, vibrations or general use can cause these components to become loose, potentially compromising the stability of the fixture. Routinely tighten any loose screws or bolts using the appropriate tools and ensure all parts are securely fastened. This simple task can help prevent accidents or damage caused by falling fixtures.
Verifying proper grounding
Proper grounding of your ceiling lights is crucial for safety. Grounding provides a path for electrical energy to escape safely in the event of a fault, preventing electrical shocks and potential fires. Periodically check that your lights are properly grounded by consulting a licensed electrician. They will be able to verify the grounding system and make any necessary adjustments or repairs to ensure your ceiling lights meet safety standards.
Identifying signs of overheating
Overheating of ceiling lights can be a serious safety concern. Signs of overheating may include excessive heat emitted by the fixture, discoloration, or a burning smell. If you notice any of these signs, it’s important to take immediate action. Turn off the power to the affected fixture and consult a licensed electrician to investigate the cause of the overheating. Continuing to use an overheating light fixture can lead to further damage or even pose a fire hazard.
Maintaining Specialized Ceiling Lights
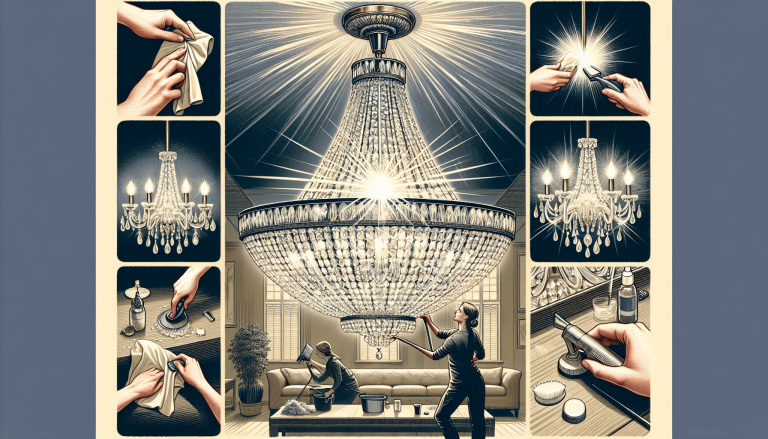
Caring for chandeliers
Chandeliers often serve as a focal point in a room, adding elegance and grandeur. To keep your chandelier looking its best, regular maintenance is essential. Begin by turning off the power to the chandelier and covering the surrounding area with a drop cloth or plastic sheet to catch any falling debris. Gently remove any crystals or delicate pieces and clean them using a soft cloth or a specialized chandelier cleaner. For the frame and other non-glass components, use a mixture of mild soapy water to wipe away dust and dirt. Take care when reassembling the chandelier, ensuring all pieces are securely attached.
Maintaining recessed lighting
Recessed lighting fixtures are popular for their sleek and modern appearance. To maintain these fixtures, start by turning off the power and removing the light bulbs. Use a soft brush or vacuum attachment to gently remove any dirt or debris that may have accumulated around the fixture. Wipe down the trim and interior components using a mixture of mild soapy water, being careful not to apply excessive moisture. Once cleaned, reinstall the light bulbs and restore the power to enjoy the renewed brightness of your recessed lighting.
Cleaning pendant lights
Pendant lights are both functional and decorative, adding a stylish touch to any space. When cleaning pendant lights, it’s important to take into account the specific materials and design of the fixture. Start by turning off the power and removing any shades or covers. Dust the surfaces using a soft cloth or a soft-bristle brush. For glass or metal components, use a non-abrasive cleaner or a mixture of mild soapy water to gently clean away dirt and smudges. Avoid using excessive moisture, as it may damage delicate pendant lights. Once clean, reassemble the pendant light and restore the power.
Taking Precautions
Turning off power before maintenance
No matter the maintenance task at hand, it’s crucial to turn off the power to the ceiling lights before starting any work. This step ensures your safety and protects against the risk of electrical shocks. Always double-check that the power is off by testing the light switch and using a voltage tester to confirm that there is no electrical current flowing to the fixture.
Wearing protective gear
When performing maintenance on your ceiling lights, wearing appropriate protective gear is essential. Protect your eyes with safety glasses to shield them from any debris or particles that may dislodge during the cleaning process. If you are working with chemicals or detergents, ensure you have proper ventilation and wear gloves to protect your skin. Prioritizing your safety by using protective gear will minimize the risk of accidents or injuries.
Using appropriate cleaning products
Choosing the right cleaning products for your ceiling lights is crucial to avoid damaging the fixtures. Harsh chemicals, abrasive cleaners, or rough materials can scratch, discolor, or even break delicate components. Always use products specifically designed for cleaning light fixtures, or opt for mild dish soap and water solutions. Additionally, refer to the manufacturer’s instructions for any product recommendations or restrictions.
Seeking Professional Help
Knowing when to hire an electrician
While many maintenance tasks can be performed by homeowners, there are instances where it is best to seek professional help. If you encounter electrical issues beyond loose connections or light bulb replacements, such as flickering lights, tripped circuit breakers, or extensive wiring problems, it is advisable to hire a licensed electrician. They have the knowledge and expertise to safely diagnose and resolve complex electrical issues, ensuring the continued functionality and safety of your ceiling lights.
Consulting a lighting expert
When dealing with specialized or high-end ceiling lights, consulting a lighting expert can provide valuable insights and guidance. Lighting experts can offer recommendations on maintenance techniques, cleaning products, and replacement parts specific to your fixtures. They can also provide tips on finding the appropriate bulbs and offer expertise on proper installation and positioning of your ceiling lights to achieve the desired aesthetic and functionality.
Getting professional inspections
For ultimate peace of mind and to ensure the longevity of your ceiling lights, consider scheduling periodic professional inspections. Licensed electricians or lighting specialists can conduct thorough examinations of your fixtures, checking for any potential issues or safety concerns. They can also perform maintenance tasks that may be beyond your expertise, such as rewiring or repairing specialized components. Regular inspections will help identify and address any problems early on, preventing costly repairs or hazardous situations in the future.
By following these comprehensive guidelines for maintaining your ceiling lights, you can keep them looking stylish, functioning optimally, and, most importantly, ensure the safety of your home or business. Regular cleaning, proper bulb replacement, cautious handling of delicate materials, and seeking professional assistance when needed will all contribute to the longevity and efficiency of your ceiling lights. Remember, a well-maintained lighting system not only enhances the ambiance of your space but also promotes a safer and more enjoyable environment for you and your loved ones.